
Quick start: horizontal wells
Retro-steer a lateral against a type well: hang the beds on a top, bend them with dip segments until the drilled GR matches the type log, and read time in zone. A well still drilling switches to steering mode.
Load the lateral, its survey and a type well
Drop the LAS files and the survey together (CSV, Excel, text report or WITSML; a survey inside the LAS works too). A survey file finds its well by API number, well name or file name. When it needs a look (rows it rejected, a grid or magnetic north reference, or a well that already has a survey), a review opens first: which column is which, the north reference and tie-in, each rejected row and why, and what a re-load would add, change or remove. Then drop a tops table, or pick the tops in the vertical on the Logs tab (Quick start, step 4). Any well whose survey holds 70° or more for at least 300 ft shows on the Lateral tab. Washouts and bad density in the vertical are flagged on import (Flags track), so check them before trusting a top there.
Survey not matched? Open the well's ⚙ in the Wells list → Load survey…. If the file has no header row, Weller Logs asks which columns are MD, inclination and azimuth.
Sidetrack? A survey that starts deep (say at 12,232 ft) is drawn vertical above its first station. If the lateral leaves a pilot or another well, pick that well under Sidetrack of (in the review, or the well's ⚙): its survey and tops above the kick-off carry over, and the lateral keeps its own logs and interpretation.
Have the directional plan? Drop it too: a file named or headed as a plan loads as a plan revision (or pick Load as: Plan in the review), drawn dashed on the map, in the section and the gun barrel. Each new plan is a revision; earlier ones stay faint. A plan for a well not yet open makes a new well; targets in TVDSS ask for the KB.
Choose the type well and anchor
On the Lateral tab, pick the horizontal under Well. Type well defaults to the nearest well with tops; change it if a better-logged vertical is close by.
No type well yet? Click Set up type well (also in the Type well list):
- Choose a vertical (nearest first), or Open a LAS…
- Add the top and base of your target: type the MD, Pick on log, or Tops file… Then Save tops.
- Check for ⚠ (a top below the log's TD, out of order, far from the surface).
- Use as type well.
The rail on the right opens one panel at a time: Segments, Type well, Section, Steering, Drilling and Well info.
Anchor (in Type well) is the top that ties the two: the type well hangs so its pick of that top lands on the lateral's own pick, made where the build section crosses it. Every dip is measured from there. The project tree on the left lists the laterals with their interpretations and logs, type wells (double-click one to use it), grids and seismic. Details: Set up a type well.
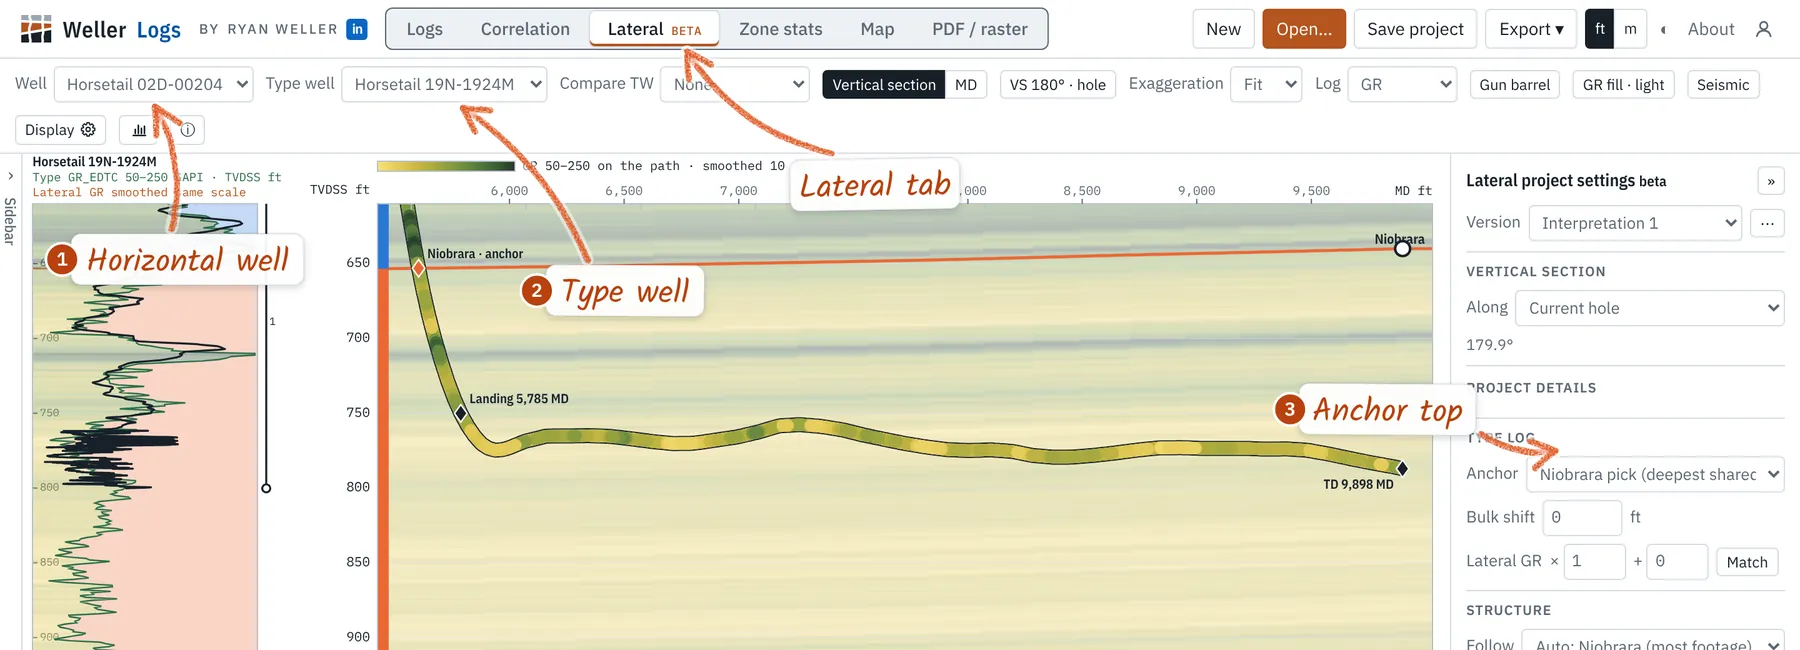
No pick on the lateral yet? Right-click the path where the build section crosses the top → pick it there. The ◆ marks it; drag it to move it.
Add segments where the dip changes
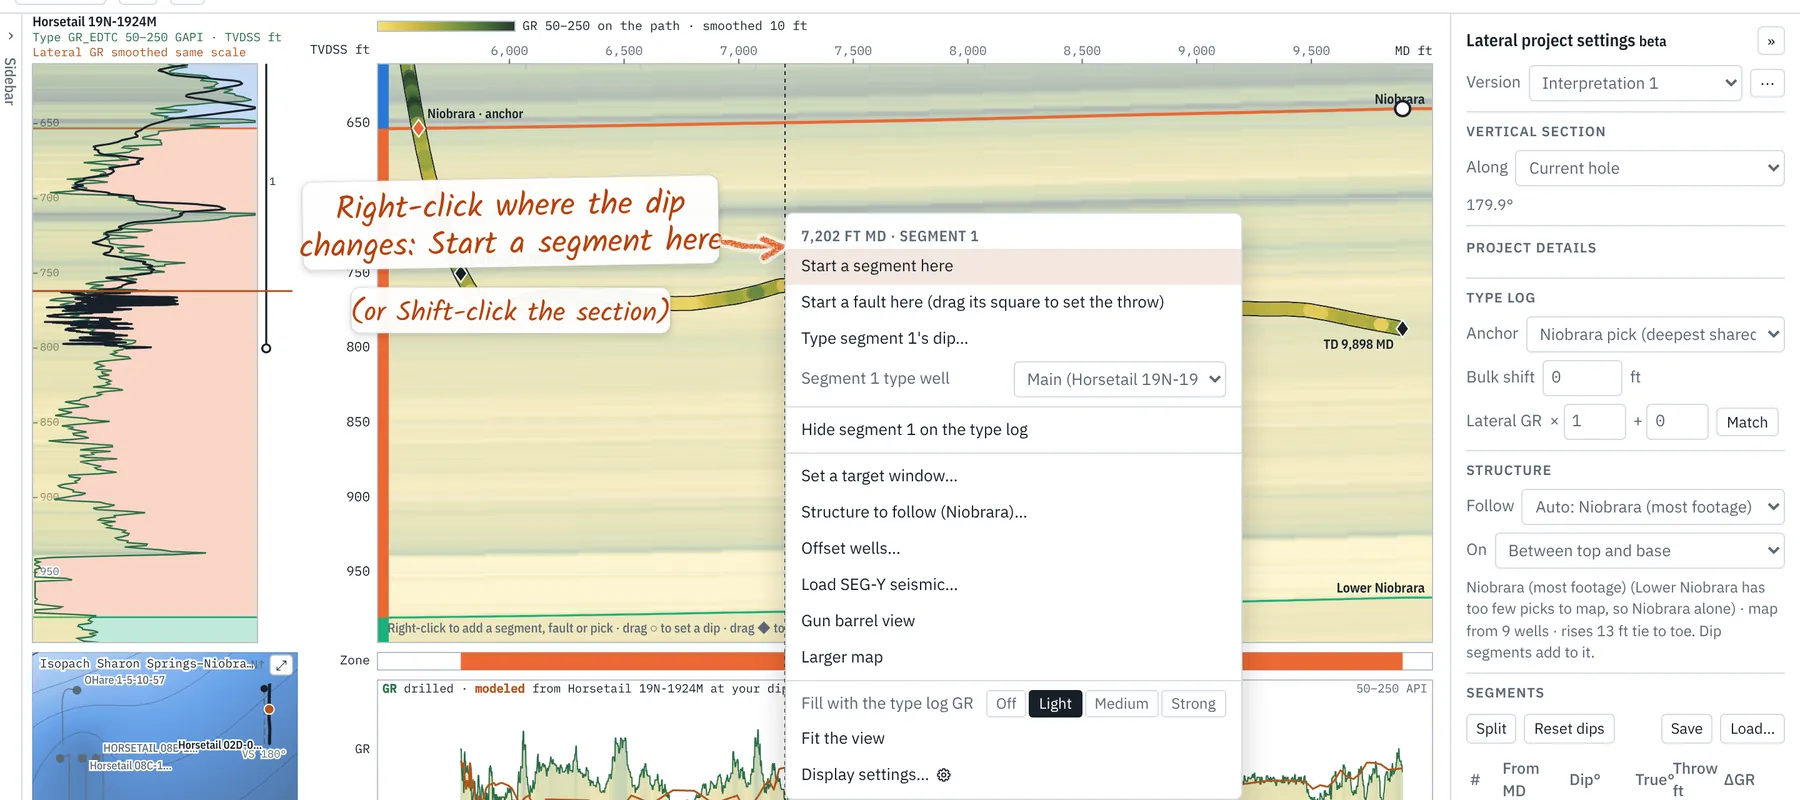
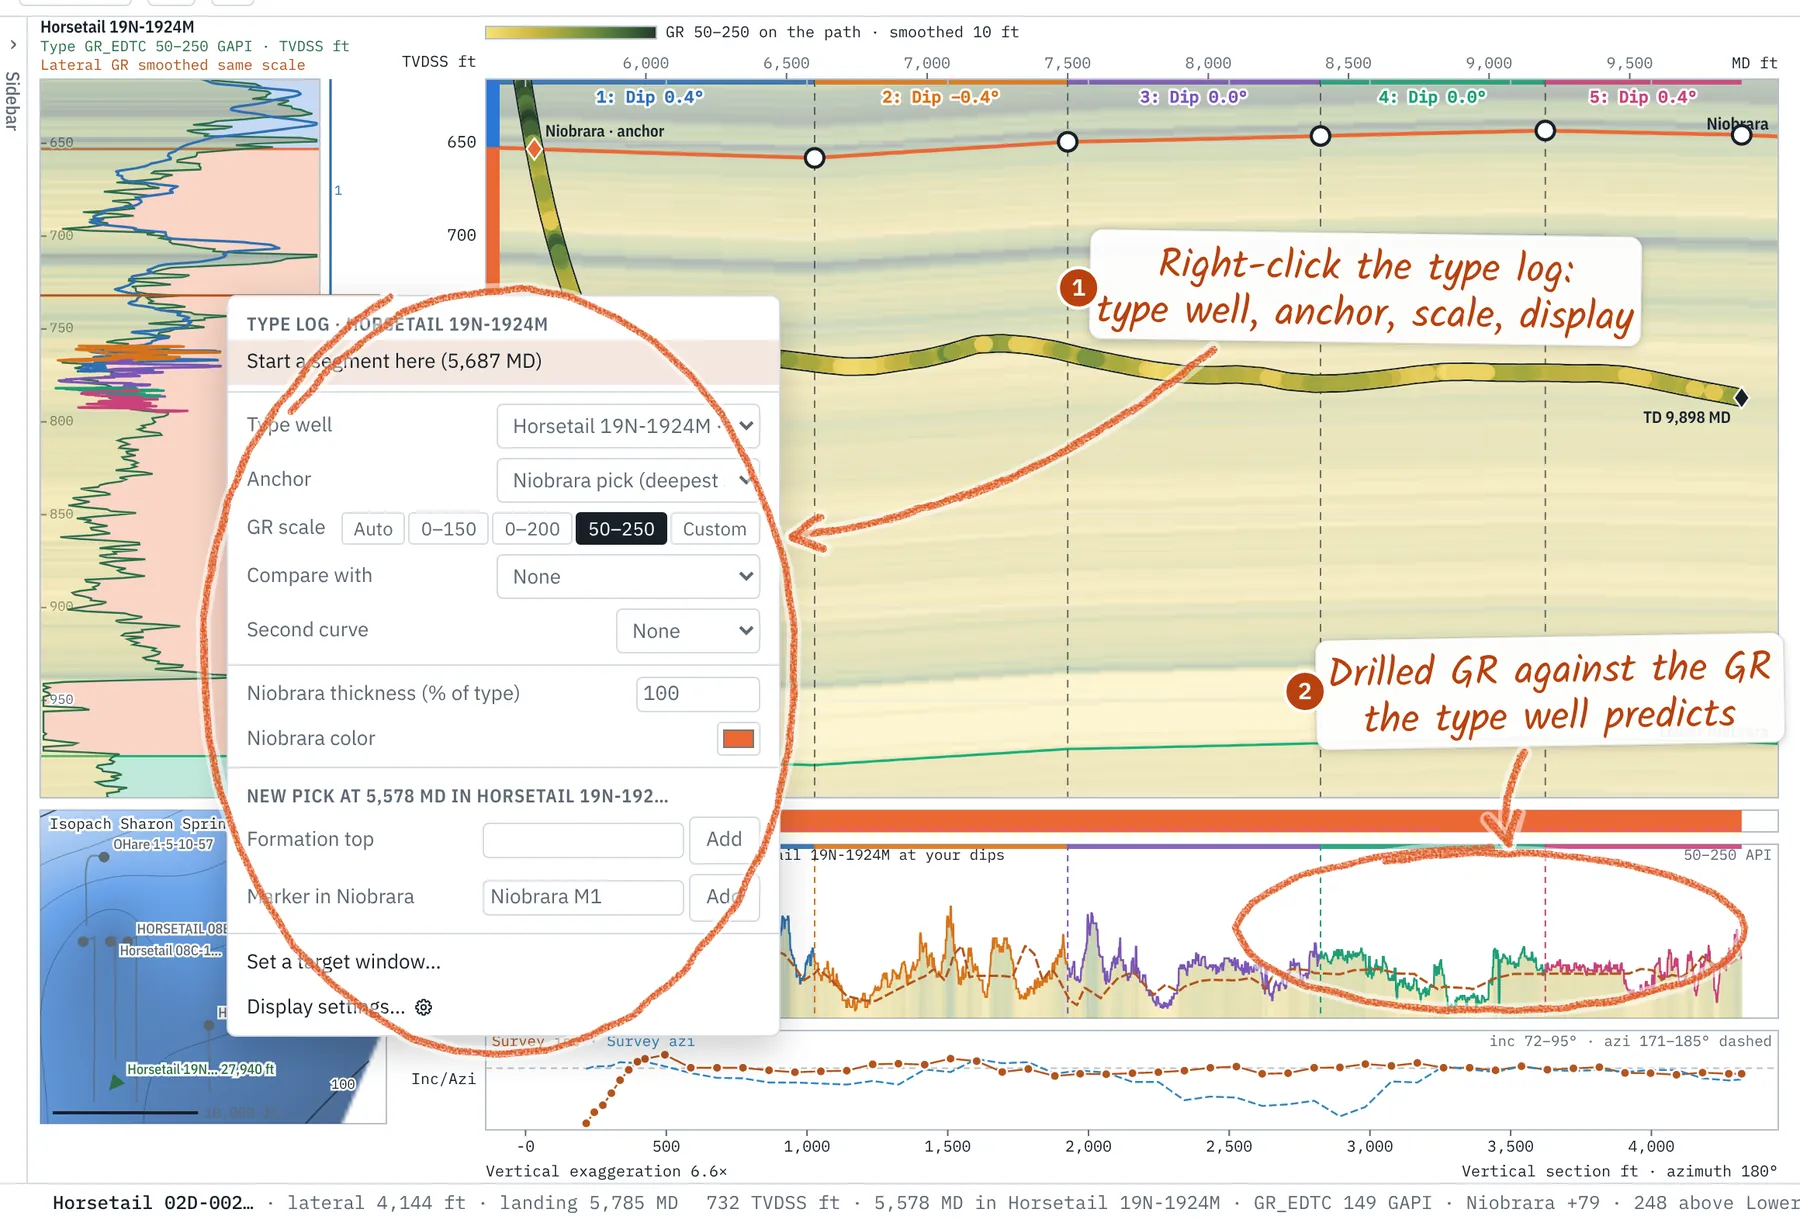
Right-click the section where the misfit starts → Start a segment here, or Shift-click. Each segment gets its own color on the section, the type log and the table. Start with a few long segments and split only where the GR says so; survey error makes short, steep segments look better than they are.
Adjust each segment's dip (or add faults)
Drag a segment's ○ up or down on the anchor bed, drag its bracket beside the type log, or type the dip in the table. Select a segment and press ↑ or ↓ to nudge it by 0.1° (Shift: 1°). Watch the trace on the type log slide and ΔGR fall. The table's ΔGR column shows which segment still misfits (green, amber, red). Where the beds step instead of bending, right-click the section → Start a fault here and drag its square to set the throw.
Let it take a first pass. Select a segment → Auto-fit… under Dip segments → Fit segment. It finds the dip, near the grid, that best matches the type log GR. With no segment selected it fits them all, heel to toe. Check each one; Ctrl+Z undoes.
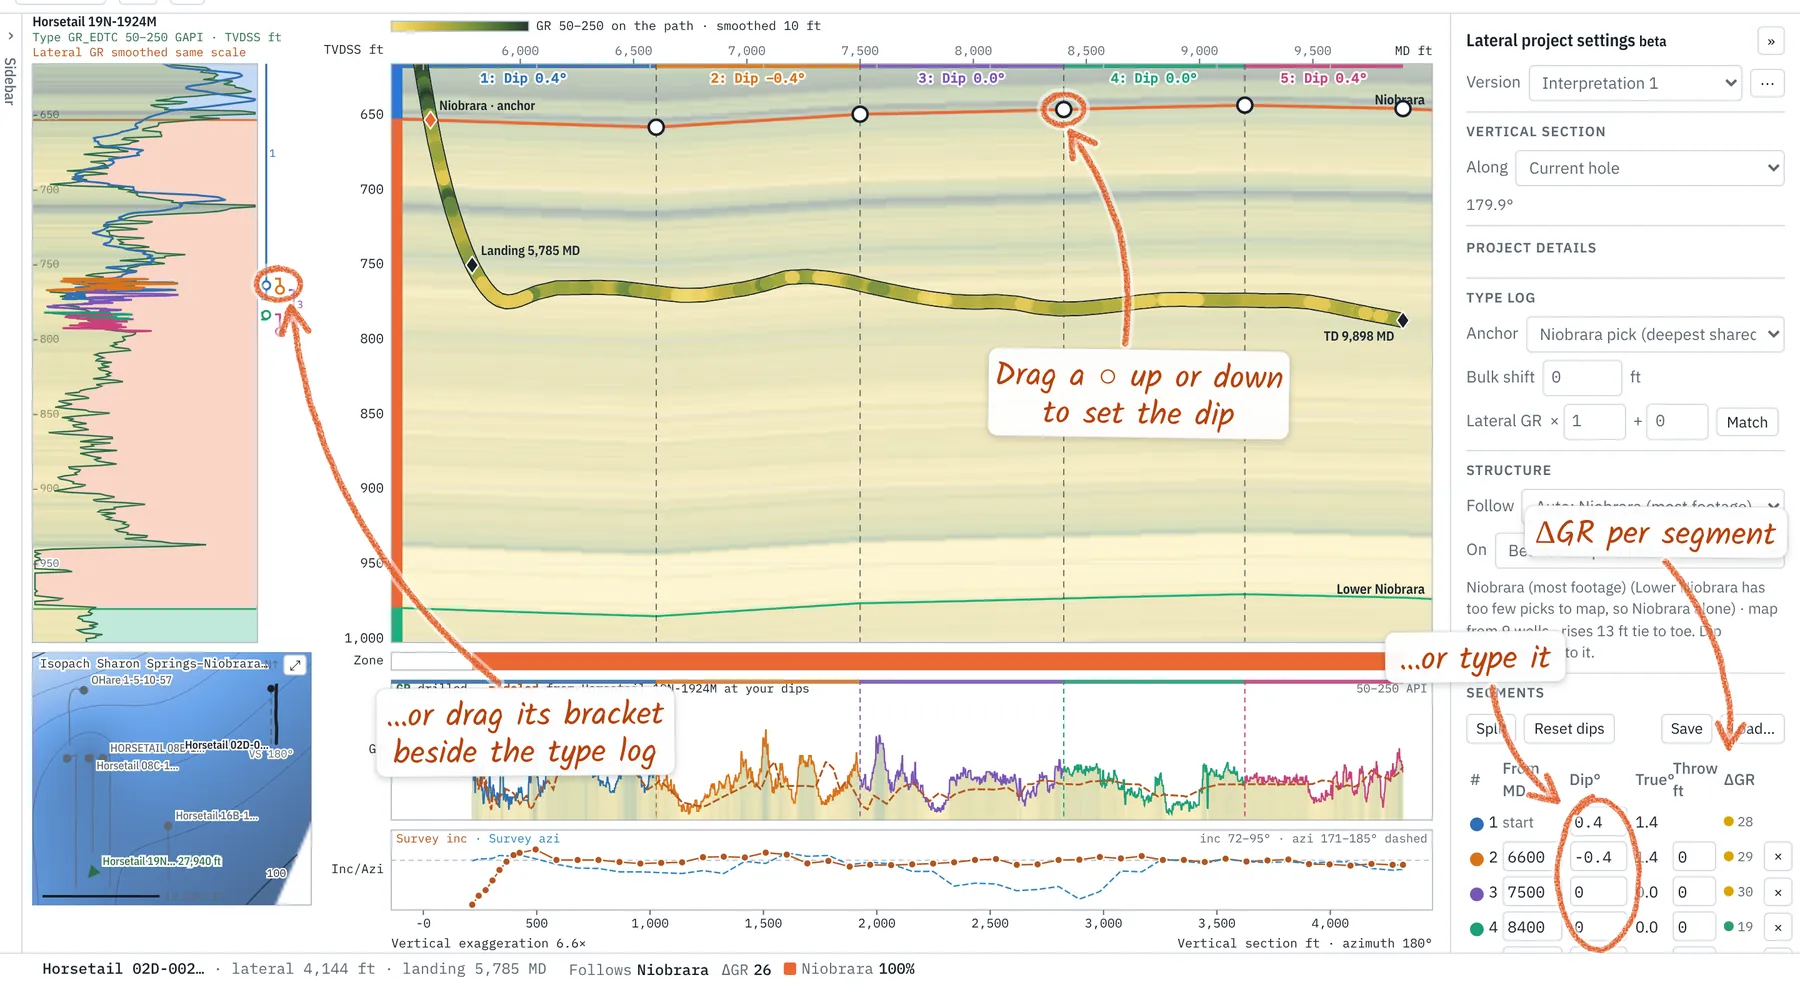
Dips are apparent, along the vertical section azimuth, positive when beds deepen toward the toe. The table also gives the true dip from nearby wells' structure. On this example, five segments cut ΔGR from 33 to 26 API.
Dip keeps hitting ±20°, or the trace fits the zone top but not its base? The zone is thicker or thinner here. Drag a top on the type log away from the anchor to thicken, toward it to thin (or right-click the zone → thickness (% of type)). See Thickening and thinning.
Steering down dip? Turn on a top's eye under Grids in the project tree: that top's surface (a structure grid from the picks) is a dashed line through the picks, carried past the bit, with its map dip over the next 500 ft in the status bar. The mini map shows the part of the section in view as a dotted box. See Surfaces and structure. When an interpretation is done, Mark as final (Version ⋯ menu); right-click the grid → Add laterals with a final interpretation folds it into the map.
Report and save
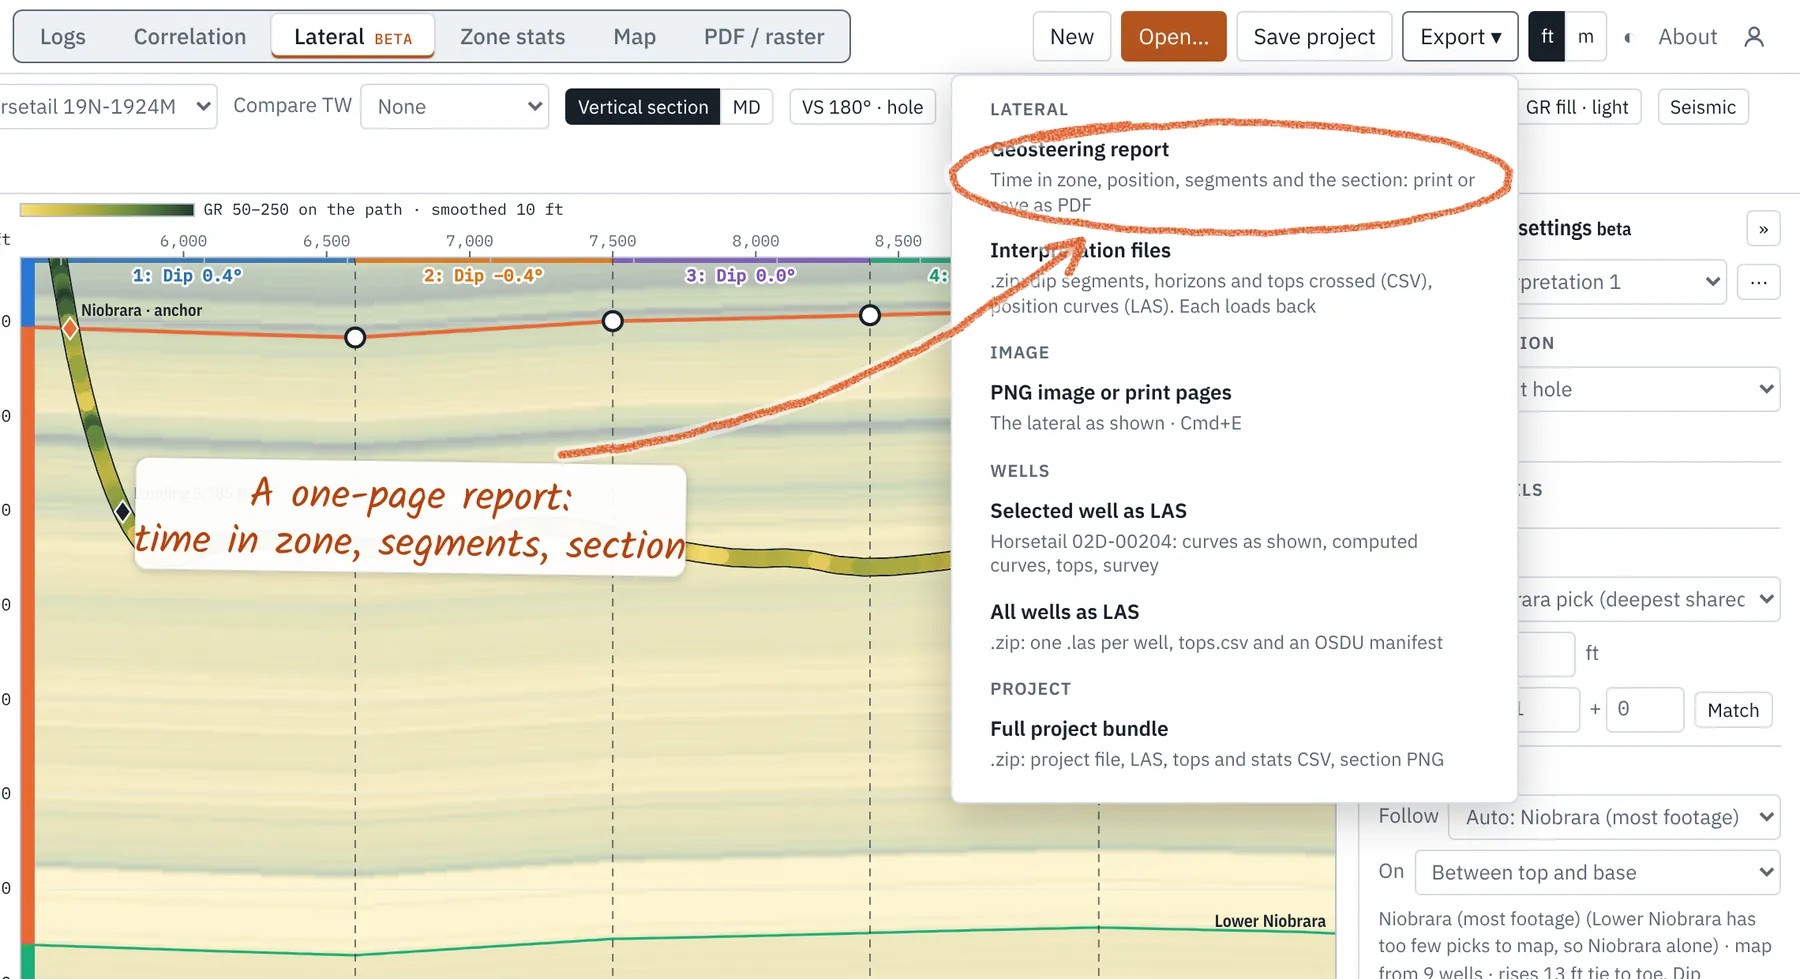
Export → Geosteering report opens its options; Build the report at the bottom gives a one-page summary to print or save as PDF. Open Customized report to add your company's name and logo once (every report carries them) and a client's, if you work for one (saved with the project). Well dates takes spud, landing and TD dates and times. The summary has time in zone and in target, footage by height above the target base (10 ft bins), position below the reference top, the segment table and the section, with survey stations and comments on it (each can be switched off), a comments table, and an optional survey page. Export → Interpretation files writes the segments, horizons, tops crossed (with latitude and longitude for mapping), position curves and the footage table to load elsewhere; All laterals packs every lateral you've opened here, one folder each. Save project keeps the interpretation with the wells.
Steering a well being drilled
Steering, on the rail at the right, shows Steering or Retro. A well you've added data to in this project, or one whose LAS is dated in the last 30 days, is steering; older wells are retro and nothing is projected. Set it by hand under Mode.
- New footage: drop the next survey or LAS on the open lateral, or type one under Add a station. You see what changes before it does; your dips stay.
- What-if: type a station (or leave it blank for the trend) and press What-if: the path and projection run on from it, the survey untouched.
- Bit position: enter each run's bit-to-sensor offsets under Runs (read from the LAS header when it has them). The panel reads Bit 18,420 ft · GR −46 ft · survey −58 ft.
- Projection: the path runs on, dashed, from the last survey to the bit and past it: hold, the trend of the last stations, or a set dogleg and toolface.
- At the bit: the zone, ft below its top and above its base, TVD and TVDSS, the recent dip and ΔGR. The status bar reads Bit: Niobrara +12 / −8 ft.
- From plan: with an active plan, high/low, left/right and 3D at the last survey and the bit, the last stand's build, turn and DLS, and the DLS to get Back on plan.
- Aiming point: ft ahead (or a VS) and a TVD or ft above a zone's base. It shows the DLS and inclination to reach it and draws a cross.
- Call: target TVD, inclination and a reason. Log call adds it to the updates; Copy gives a call sheet to paste.
- Handover: notes since 12 h, 24 h or the last handover: footage, surveys, calls, position, open questions. Copy or Email.
- Survey sheet: Drilling → Survey sheet on the right-hand rail lists every station with TVD, VS, dogleg, build, turn, toolface, time and the zone it sits in, flags likely bad or missed stations, and saves CSV. Click a row to go to the station; Pop out puts it on a second screen.
- Comments: right-click the wellbore → Add a comment here for a bit trip, a handover or pumps down, with a date and time. They show as boxes along the wellbore, beside the survey dots, and save as CSV from Comments.
Key navigation
Right-click anything for its options (on an iPad, long-press; pinch to zoom). On the type well that means the anchor, the GR scale, zone thickness and color, a new pick, which segments show, the target window, and display settings (a second curve and a 2nd type well are there). The strip under the section shows drilled GR against the GR the type well predicts at your dips; ΔGR in the status bar is the gap between them in API, lower is better. Scale bars over the type log give the type well's GR and the lateral's. Each strip's scale reads at its left edge (top and bottom values); click the strip's name ▾ to change it. Point at a segment's bracket to bring its trace forward on the type log. Over the Inc/Azi strip, the status bar gives inclination and azimuth at the pointer and the nearest survey station's own readings. The wheel zooms the section; over the type log it zooms the type log alone (double-click relinks it).
Detailed geosteering functions
Faults, thickness changes, a target window, multiple type wells, the map and gun barrel (with its contour interval), seismic, interpretation versions and stats are in the geosteering guide.